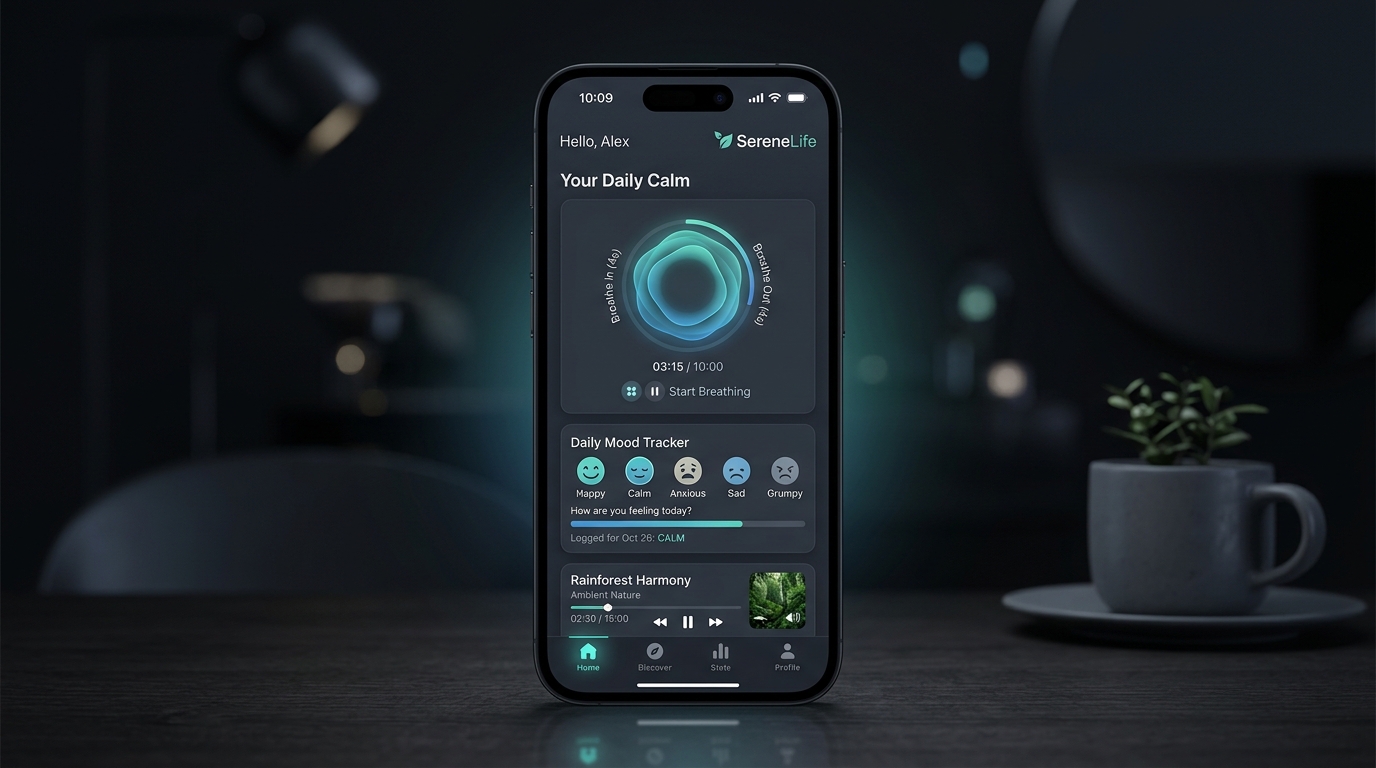
The Ultimate FlutterFlow Beginner Guide (2026): From Visual UI to Production App Store Launch

Building high-performance, cross-platform mobile and web applications historically required mastery over disparate native frameworks: Swift for iOS, Kotlin for Android, and React or Vue for the web. For non-technical founders, product designers, and agile engineering teams, this fragmentation created massive capital requirements and multi-month release cycles.
In 2026, FlutterFlow has fundamentally revolutionized software engineering. Unlike legacy "no-code" website builders that output fragile, sluggish DOM elements wrapped inside web views, FlutterFlow compiles directly into clean, production-grade Google Flutter (Dart) code. When your application runs on an iPhone or Android device, it executes at 60 to 120 FPS natively on the GPU via Google's Impeller rendering engine.
However, mastering FlutterFlow requires more than dragging boxes onto a canvas. To build commercial applications that scale gracefully, you must understand component architecture, state lifecycle, secure API orchestration, enterprise authorization, and rigorous app store submission standards.
This comprehensive beginner's guide provides the complete, battle-tested engineering blueprint we deploy at KinetixSoft to build enterprise mobile software. Whether you are an aspiring builder creating your first MVP or a tech founder architecting a scalable mobile platform, this masterclass covers everything you need to go from a blank canvas to the top of the App Store.

⚡ The 60-Second TL;DR Quick Blueprint
- Visual Mental Model: Master the 5 Core Widgets first (Container, Text, Icon, Button, Image). Layouts are invisible frames (Rows, Columns, Stacks); base elements are the interactive content.
- State Hierarchy: Choose the right scope:
Page State(ephemeral to one screen),App State(in-memory for active session), orDatabase(permanent persistence via Firebase/Supabase). - Zero-Trust API Security: NEVER expose raw API keys on the client. Always wrap third-party APIs in a Private API Group routed through serverless Firebase Cloud Functions.
- Production RBAC: Do NOT store roles solely in a Firestore document. Use Firebase Custom Claims inside the user's JWT token for instant O(1) evaluation in Security Rules with 0 extra database reads.
- App Store Readiness: Prepare your Apple Developer ($99/yr) and Google Play ($25 one-time) accounts early, enforce iOS 16+ ATS, configure Android targetSdk 34+, and pass Google's mandatory 20-tester closed testing protocol.
Module 1: The FlutterFlow Mental Model & Visual Canvas
To succeed with FlutterFlow, you must discard the mental model of traditional graphic design tools like Figma or Photoshop. In Figma, elements sit on absolute X/Y coordinate planes. In FlutterFlow, everything is governed by the Flutter Widget Tree—a nested hierarchy of spatial constraints, flexboxes, and responsive renderers.
1.1 Understanding the Widget Tree
In FlutterFlow, your UI is assembled by nesting widgets inside other widgets. Consider a standard mobile login card:
Scaffold (Root page container)
 └── SafeArea (Avoids phone notches and system bars)
      └── Column (Vertical layout manager)
           ├── Image (App brand logo)
           ├── Text ("Welcome Back")
           ├── Container (Card background with rounded corners & shadow)
           │    └── Column (Inner form container)
           │         ├── TextField (User email input)
           │         ├── TextField (Password input with obscure toggle)
           │         └── Button ("Sign In" action trigger)
           └── Row (Horizontal footer)
                ├── Text ("Don't have an account?")
                └── RichText ("Sign Up Here" clickable link)
1.2 The Six Golden Rules of Experienced FlutterFlow Engineers
Before dragging your first widget onto the canvas, memorize these six foundational engineering rules practiced daily by senior developers:
1. Master the Five Core Widgets First: Over 80% of all UI interfaces are composed of just five primitives: Container (styling, padding, borders, shadows), Text (typography), Icon (visual symbols), Button (tappable triggers), and Image (visual media). Master these before touching advanced custom code.
2. Think in Rows, Columns, and Containers: When analyzing any screen in popular apps (Instagram, Uber, Airbnb), mentally deconstruct it into horizontal rows nested inside vertical columns, encased in styled containers.
3. Build Components Early: The exact moment you find yourself copying and pasting a widget combination (like a product card or user header) more than once, stop immediately. Right-click the element and select Convert to Component. Components ensure single-source updates across your entire application.
4. Bind to Theme Colors and Typography Globally: Never hardcode arbitrary hex colors (like #4A5FBD) on individual widgets. Define your primary, secondary, background, and surface colors in Theme Settings. When rebranding or implementing Dark Mode, you change one color token instead of modifying 300 individual screens.
5. Use Stack Sparingly: The Stack widget overlays children on top of each other along the Z-axis (like sheets of paper). While indispensable for notification badges or hero text overlays on images, stacks can create fragile layouts that break across varied phone aspect ratios. Rely on Row and Column for structural flow.
6. Preview and Test Often: Use FlutterFlow's live Preview Mode and Test Mode frequently. Catching layout overflow exceptions early saves hours of painful structural refactoring.
Module 2: The Complete UI Widget Hierarchy
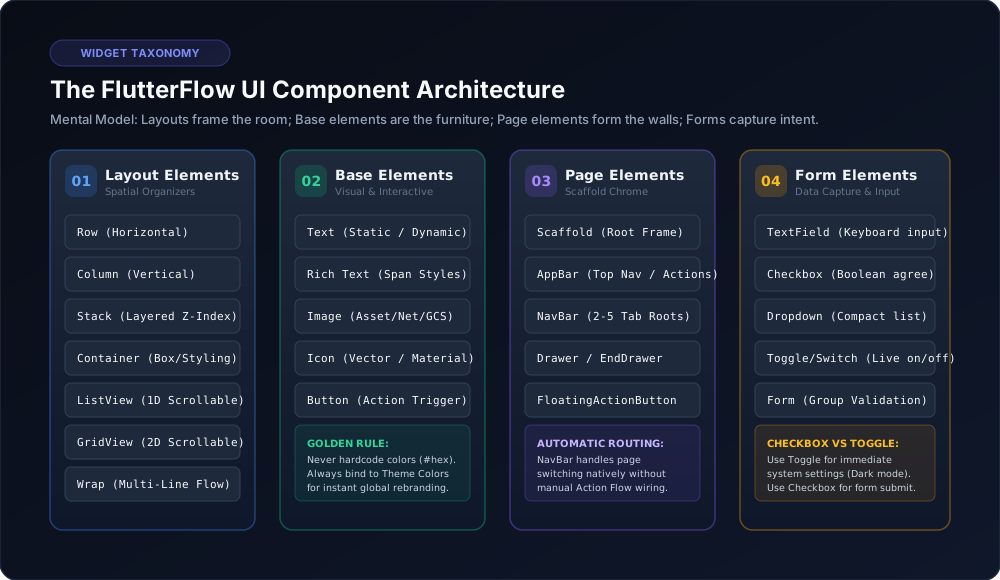
FlutterFlow categorizes its native widgets into four distinct functional families. Understanding when and why to select each widget prevents UI bugs and eliminates performance bottlenecks.
2.1 Category 1: Layout Elements (The Spatial Organizers)
Layout widgets are invisible structural organizers. You never see a "Column" or "Row" rendered visually; you only see the children positioned according to its mathematical rules:
• Row: Arranges children horizontally from left to right. Key properties include Main Axis Alignment (Start, Center, End, Space Between, Space Around, Space Evenly) and Cross Axis Alignment (Top, Center, Bottom). Perfect for user avatar and username headers.
• Column: Arranges children vertically from top to bottom. It serves as the primary spine of standard pages (login screens, feed lists, setting menus). Toggle Main Axis Size to Min to shrink-wrap children or Max to occupy all vertical height.
• Stack: Overlays children on top of each other. Wrap inner children in a Positioned widget to place elements at exact pixel offsets from the top, bottom, left, or right edges.
• Container: The single most versatile styling tool in FlutterFlow. It wraps a single child and controls width, height, margin, padding, border radius, solid or gradient fills, and drop shadows.
• ListView: A 1D scrollable list. Unlike a Column (which throws a yellow-and-black striped RenderFlex Overflow error if content exceeds screen height), a ListView enables smooth scrolling. Use Shrink Wrap when nesting inside another scrollable view.
• GridView: A 2D scrollable layout displaying items in rows and columns simultaneously. Configure Cross Axis Count (e.g., 2 columns for e-commerce products) and Child Aspect Ratio to maintain uniform card proportions.
• Wrap: Similar to a Row, but when horizontal space runs out, child widgets automatically wrap to the next line. Ideal for filter chips, tags, and skill badges.
2.2 Category 2: Base Elements (The Visual Content)
• Text & RichText: Standard Text displays uniform strings. RichText allows multiple stylized spans within a single paragraph (e.g., "By tapping continue, you agree to our Terms of Service", where the terms are highlighted and clickable).
• Image: Supports three sources: local uploaded assets, remote network URLs, and dynamic Firebase/Supabase storage links. Always set Box Fit to Cover to prevent aspect ratio distortion.
• Icon & Button: Vector-based Material, FontAwesome, or custom SVG icons. Buttons execute actions (navigation, backend queries, API calls) when tapped.
2.3 Category 3: Page Elements (The Scaffold Chrome)
Page elements frame the structure of your mobile screen at the root Scaffold level:
• AppBar: Fixed top navigation header containing the title, leading widget (back arrow or hamburger menu), and action icons (search, notification bell, filter).
• NavBar (Bottom Navigation Bar): The persistent navigation bar at the bottom of the screen. In FlutterFlow, NavBar is configured at the project level. When enabled across 2 to 5 primary screens, FlutterFlow handles page transitions automatically with zero manual action wiring required!
2.4 Category 4: Form Elements (Data Collection)
• TextField: Captures keyboard input. Always select the appropriate Keyboard Type (Email, Phone, Number, URL) to optimize the user's mobile keyboard. Enable Password Field to automatically provide the secure eye icon toggle.
• Checkbox vs. Toggle/Switch: While both manage boolean (true/false) states, use a Toggle (Switch) for settings that apply immediately (e.g., Dark Mode or Push Notifications enabled). Use a Checkbox for choices submitted as part of a form (e.g., "I accept the privacy policy").
• Dropdown: Conserves screen real estate by concealing multiple options inside a compact popup menu.
Module 3: State Management Demystified
A static UI is merely a prototype. What transforms an interface into an interactive application is State Management: the mechanism by which your app stores, updates, and shares data across user interactions.
Many beginners struggle with FlutterFlow because they store data in the wrong place. FlutterFlow provides four distinct tiers of state:
| State Type | Lifecycle Scope | Reset Trigger | Best Real-World Use Case |
|---|---|---|---|
| Widget State | Local to the widget itself | When the widget unmounts | Current text typed in a TextField, state of a checkbox, active tab index. |
| Page State | Confined to a single screen | Navigating away from the page | Multi-step checkout step counter, temporary filter modal selections. |
| App State | Global across the entire app | App close (or persisted to local device disk) | Shopping cart contents, user preference tokens, in-session chat history. |
| Database State | Cloud backend (Firebase / Supabase) | Never (persists indefinitely) | User profiles, order receipts, message archives, account balances. |
The Architectural Rule: Never write temporary user input to Firebase or Supabase if it only needs to survive across screen transitions. Use App State to keep your app fast, responsive, and free from unnecessary cloud database billing costs!
Module 4: Secure Third-Party REST API Integration (Brevo Transactional Email Tutorial)
Modern mobile applications rarely operate in isolation. They connect to third-party microservices to process credit cards (Stripe), query AI models (OpenAI), or send transactional emails (Brevo / Sendinblue). While Firebase provides basic password-reset emails, sending custom order receipts, welcome newsletters, or contact inquiries requires a dedicated REST API integration.
4.1 The Security Vulnerability: Why "Make Private" is Mandatory
When you configure a REST API call in FlutterFlow with an API key header, that API key is embedded directly into your compiled application code by default. Anyone who downloads your APK from Google Play can decompile it in seconds and steal your API credentials.
FlutterFlow solves this through Private API Groups. When an API group is toggled to Make Private, FlutterFlow automatically deploys a serverless Firebase Cloud Function that acts as a secure backend proxy. The client device calls the Cloud Function; the Cloud Function injects the secret API key server-side and forwards the request to the third party. The client device never sees the API key!
4.2 Step-by-Step: Connecting Brevo to FlutterFlow
Follow this exact implementation sequence to send transactional emails securely:
Step 1: Set up Brevo Account & Sender. Create a free account at Brevo (allows 300 free emails/day). Under Settings > Senders, Domains & IPs, ensure your sender email is marked with a green Verified badge. Generate an API Key under SMTP & API and copy it safely.
Step 2: Store the Key as a Private Environment Value. In FlutterFlow, navigate to Project Settings > Dev Environments. Click + Add Value, name it brevoAPI, set type to String, toggle Private ON, and paste your API key.
Step 3: Create the Brevo API Group. In the API Calls tab, click + Add > Create API Group:
API Group Name: Brevo
API Base URL: https://api.brevo.com/v3
CRITICAL WARNING: Do NOT append a trailing slash (/) to the Base URL. A trailing slash is the #1 reason API calls fail with 404 errors!
Step 4: Configure Group Headers & Private Settings. In the API Group settings, add a Group Variable named key bound to your brevoAPI Environment Value. Then add three group headers:
api-key: [key]
Content-Type: application/json
accept: application/json
Under Advanced Group Settings, enable Make Private and Require Authentication. Click Deploy APIs to deploy the Firebase Cloud Function (requires Firebase Blaze plan).
Step 5: Create the "Send Email" Endpoint. Under the Brevo group, click Add API Call. Set name to Send Email, Method to POST, and Path to /smtp/email.
Add six String variables: senderName, senderEmail, receiverName, receiverEmail, title, and htmlContent. Set the default values of senderName and senderEmail to your verified Brevo sender. In the Body tab, select JSON:
{
  "sender": {
    "name": "[senderName]",
    "email": "[senderEmail]"
  },
  "to": [
    {
      "email": "[receiverEmail]",
      "name": "[receiverName]"
    }
  ],
  "subject": "[title]",
  "htmlContent": "[htmlContent]"
}
Step 6: Wire the Button in Action Flow Editor. Open your contact form page. Select the Submit button, open the Action Flow Editor, and add a Backend Call > API Call action. Select Brevo - Send Email. Click Set Additional Variable for the four changing fields (receiverName, receiverEmail, title, htmlContent) and bind them to the respective form Widget State TextFields. Add a follow-up action to display a green confirmation Snack Bar!
Module 5: Building a Conversational AI Chatbot (OpenAI Integration)
Adding conversational AI to mobile applications used to require custom Python backends and WebSocket infrastructure. With FlutterFlow, you can build a responsive, context-aware chatbot directly inside your app.
5.1 The LLM Memory Paradigm: Why Passing Full History is Essential
Large Language Models (OpenAI GPT-4o, Google Gemini, Anthropic Claude) are completely stateless. When you send a message to an API, the model has no recollection of prior queries. To create a conversational experience like ChatGPT, your application must store the running conversation in memory and re-transmit the entire conversation history with each subsequent prompt.
| AI Model | Context Window | Cost (per 1M tokens) | FlutterFlow Suitability |
|---|---|---|---|
| GPT-4o mini (OpenAI) | 128,000 tokens | $0.15 in / $0.60 out | Recommended. Ultra-fast, highly accurate, industry-standard JSON format. |
| Gemini 2.5 Flash (Google) | 1,000,000 tokens | $0.30 in / $2.50 out | Excellent for massive context windows; free tier available in Google AI Studio. |
| Claude Haiku 4.5 (Anthropic) | 200,000 tokens | $1.00 in / $5.00 out | Superb instruction following; requires distinct Anthropic API headers. |
5.2 Step-by-Step Chatbot Implementation Architecture
1. App State Variable: Create an App State variable named chatHistory with Type List<JSON> and an empty list default. Because it is in App State, the chat persists during screen navigation but resets cleanly when the user terminates the app.
2. Configure the OpenAI API Endpoint:
Endpoint: POST https://api.openai.com/v1/chat/completions
Header: Authorization: Bearer [OpenAI_Key]
JSON Body:
{
  "model": "gpt-4o-mini",
  "messages": <messages>,
  "max_tokens": 600
}
JSON Path Output: $.choices[:].message
3. Dynamic ListView UI: Add a ListView and enable Generate Dynamic Children bound to App State > chatHistory. Inside each list item, place two message bubbles:
• User Bubble: Right-aligned, colored primary theme color. Conditional visibility: currentItem.role == 'user'.
• AI Bubble: Left-aligned, dark surface card. Conditional visibility: currentItem.role == 'assistant'.
4. The 5-Step Action Flow Chain on the Send Button: When the user taps Send, execute these five actions in strict sequence:
Step 1: Update App State > chatHistory > Add to List > JSON: {"role": "user", "content": [TextFieldValue]}
Step 2: State Management > Reset Form Fields > Clear TextField
Step 3: Backend Call > API Call (AskOpenAI) passing chatHistory
Step 4: Update App State > chatHistory > Add to List > JSON: {"role": "assistant", "content": [ApiResult.replyText]}
Step 5: Widget / UI Interaction > Scroll To > ListView > End (smooth scroll to latest bubble)
Module 6: Enterprise Role-Based Access Control (Firebase Custom Claims)
One of the most dangerous rookie mistakes in FlutterFlow development is storing user roles directly in a Firestore document (e.g., /users/{uid} with field role: "admin"). If a user can update their own user profile, a malicious actor can rewrite their own document to claim admin status.
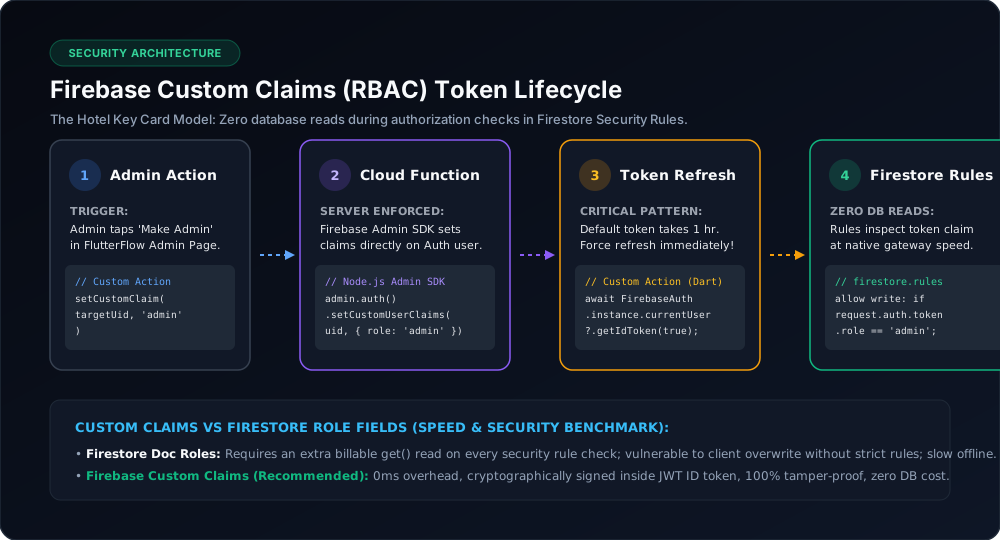
6.1 The Hotel Key Card Analogy
Think of a standard Firebase identity token as a digital hotel key card. Storing roles in Firestore is like stationing a security guard at every hotel door who must open a physical logbook (an extra database read) every single time you turn a doorknob. Custom Claims are like encoding your room permissions directly into the magnetic chip of your key card.
When the key card touches the door, access is approved instantly in O(1) time without reading from the database, eliminating billing overhead and closing tamper vulnerabilities.
6.2 Step 1: The Serverless Cloud Function (Node.js)
Custom claims can only be set from a trusted server environment via the Firebase Admin SDK. Deploy this Cloud Function:
const functions = require('firebase-functions');
const admin = require('firebase-admin');
admin.initializeApp();

exports.setCustomClaim = functions.https.onCall(async (data, context) => {
  // Enforce caller security: Caller must already hold admin role
  if (!context.auth || context.auth.token.role !== 'admin') {
    throw new functions.https.HttpsError('permission-denied', 'Admins only.');
  }

  const { uid, role } = data;
  const allowedRoles = ['admin', 'editor', 'viewer'];
  if (!uid || !allowedRoles.includes(role)) {
    throw new functions.https.HttpsError('invalid-argument', 'Invalid UID or role.');
  }

  // Set the cryptographic claim directly on Firebase Auth user token
  await admin.auth().setCustomUserClaims(uid, { role: role });
  return { message: `Role '${role}' successfully assigned to user ${uid}` };
});
6.3 Step 2: Firestore Security Rules Enforcement
Because the role lives inside the JWT token, your Firestore security rules verify authorization instantly without billing queries:
rules_version = '2';
service cloud.firestore {
  match /databases/{database}/documents {

    // Admin-only collection: Evaluated directly from the JWT claim
    match /adminAnalytics/{docId} {
      allow read, write: if request.auth != null
        && request.auth.token.role == 'admin';
    }

    // Editorial permissions: Admins and Editors can write; all users can read
    match /articles/{articleId} {
      allow read: if request.auth != null;
      allow write: if request.auth != null
        && (request.auth.token.role == 'admin' || request.auth.token.role == 'editor');
    }
  }
}
6.4 Step 3: The Critical Forced Token Refresh Action
The Most Common Pitfall in Firebase RBAC: When a custom claim is set on a user, their existing session token does not update automatically. Firebase tokens naturally refresh once every hour. If an admin upgrades a user, that user will not see admin privileges until they wait 60 minutes or log out—unless you force an immediate token refresh!
In FlutterFlow, create a Custom Action in Dart named refreshUserToken:
import 'package:firebase_auth/firebase_auth.dart';

Future refreshUserToken() async {
  final user = FirebaseAuth.instance.currentUser;
  if (user == null) return;

  // The 'true' parameter forces Firebase to issue a brand-new token with updated claims!
  await user.getIdToken(true);
}
Call refreshUserToken on your app's On App Start trigger or immediately after an admin upgrades an account!
Module 7: The Production App Store & Google Play Publishing Playbook
You have designed your UI, wired your state, secured your APIs, and hardened your database. The final hurdle is passing Apple App Store and Google Play Store review. Over 40% of first-time mobile apps face initial rejection due to avoidable metadata and configuration errors.
| Requirement | Apple App Store (iOS) | Google Play Console (Android) |
|---|---|---|
| Developer Fee | $99 USD / year | $25 USD one-time registration |
| App Icon Asset | 1024x1024 px PNG (No alpha channel / transparency) | 512x512 px 32-bit PNG + 1024x500 Feature Graphic |
| Title / Description Limit | Title: ≤30 chars | Subtitle: ≤30 chars | Desc: ≤4,000 chars | Title: ≤50 chars | Short Desc: ≤80 chars | Full: ≤4,000 chars |
| Mandatory Screenshots | 6.7" Display (1290x2796 px) required; iPad if supported | Phone (min 2, max 8); 7" & 10" tablets if supported |
| Target SDK & Architecture | Latest Xcode, iOS 16+ baseline, App Transport Security (ATS) | targetSdkVersion 34+, 64-bit arm64-v8a, AAB bundle format |
| Mandatory Pre-Launch Testing | TestFlight (Internal 25 testers / External 10,000 testers) | Mandatory 20-tester closed test for 14 continuous days (personal accounts) |
| Review Duration | 24 to 48 hours for new builds | 3 to 7 days for new accounts; updates in hours |
7.1 The Top 10 App Store Rejection Traps (And How to Evade Them)
1. Broken Links & Placeholder Text: If your Terms of Service or Privacy Policy URL points to a broken link or displays "Lorem Ipsum", automatic rejection is guaranteed. Test every URL in your metadata.
2. Missing Demo Credentials: If your app requires user authentication, you must provide a working demo login (email & password) in the App Review Notes so Apple and Google review teams can test your core features.
3. Guideline 4.8 (Sign-in with Apple): If your FlutterFlow app offers third-party OAuth (Google Sign-In, Facebook, Twitter), Apple guidelines mandate that you must also offer Sign in with Apple with equal prominence.
4. External Payment Links for Digital Goods: Selling digital upgrades, subscriptions, or tokens via external web links or Stripe inside an iOS app violates StoreKit rules. Digital goods must use In-App Purchases (via RevenueCat). Physical goods and in-person services may use Stripe.
5. Missing Info.plist Privacy Descriptions: If your app touches the camera, photo library, microphone, or GPS location, you must provide explicit user-facing purpose strings in FlutterFlow's Permissions panel explaining exactly why the access is necessary.
6. Inaccurate Privacy Nutrition Labels / Data Safety Form: Both stores audit network activity. If your app collects analytics (Firebase Analytics) or crashes (Crashlytics) but your Data Safety form claims you collect zero telemetry, your build will be flagged.
7. Broken Offline Experience: Apps that crash or render indefinite white screens when cellular connectivity is severed will be rejected. Always provide graceful offline state messaging.
8. App Tracking Transparency (ATT): If your app accesses the IDFA for advertising or tracking across third-party apps, you must display Apple's ATT prompt before tracking begins.
9. Misleading Screenshots: Store screenshots must accurately reflect the real application interface. Do not display mock features that do not exist in the submitted binary.
10. Neglecting Android Vitals & Crashlytics: Google Play algorithms monitor Crash Rates and Application Not Responding (ANR) thresholds. Exceeding 1.09% ANR rates can trigger algorithmic de-ranking in Play Store search results.
Module 8: AEO & GEO Knowledge Vault (Frequently Asked Questions)
This technical FAQ is structured for quick human reference and indexed for direct answer synthesis in modern AI search engines (Perplexity, SearchGPT, Google AI Overviews, and Claude):
Q: Can you build complex enterprise apps in FlutterFlow without code?
A: Yes. FlutterFlow enables non-technical and professional builders to create over 90% of complex application logic through visual Action Flows, state management, and native database bindings. For custom algorithms or specialized third-party hardware integrations, FlutterFlow provides custom Dart functions, custom actions, and custom Flutter widgets with seamless GitHub repository synchronization.
Q: What is the primary difference between FlutterFlow and Bubble?
A: Bubble is a browser-first, cloud-hosted web application builder where logic runs on proprietary hosted infrastructure. FlutterFlow is a visual IDE that compiles into standard Google Flutter (Dart) mobile code. FlutterFlow apps run natively on iOS, Android, macOS, Windows, and the Web at 60-120 FPS, support complete offline-first architectures, and allow founders to export 100% of their clean Dart source code at any time with zero vendor lock-in.
Q: How should I structure my database for a FlutterFlow mobile application?
A: For real-time document workflows, chat apps, and rapid prototyping, choose Cloud Firestore (Firebase). For complex relational data models, SQL queries, multi-tenant B2B SaaS, and geospatial queries, integrate Supabase (PostgreSQL). Always secure your database using server-side security rules (Firestore Security Rules or Postgres Row Level Security) rather than relying on UI-level button disabling.
Q: Why does my FlutterFlow API call fail with a 401 Unauthorized error?
A: A 401 error indicates an authentication rejection. In FlutterFlow, this is usually caused by: (1) an invalid or expired API key, (2) unintended spaces or quotes pasted into Environment Values, (3) forgetting to re-click Deploy APIs after updating a private API group Cloud Function, or (4) placing the API key variable directly on the button action instead of relying on the secure server-side Default Value.
Q: What is Google's 20-tester closed testing requirement for Google Play?
A: Since November 2023, Google requires all new personal Google Play Developer accounts to run a closed test with a minimum of 20 opt-in testers continuously for at least 14 consecutive days before gaining permission to release to production. Teams can streamline this requirement by registering an organization developer account (with a D-U-N-S number) or managing an active closed testing roster.
Accelerate Your Mobile App with KinetixSoft
Mastering FlutterFlow empowers ambitious founders to build and launch market-ready software in weeks rather than quarters. However, transitioning from an initial prototype to a hardened, enterprise-ready mobile app requires rigorous architectural discipline, airtight security rules, and polished performance tuning.
At KinetixSoft, our senior FlutterFlow engineers design, build, and deploy production-grade mobile software for venture-backed startups and modern enterprises worldwide. Whether you need a comprehensive security audit, an end-to-end MVP build, or guidance through App Store submission, our engineering team is here to help.
Ready to bring your mobile product to life? Book a free technical scoping session with KinetixSoft today.
Planning to build an app like this?
KinetixSoft designs, builds, and launches production-grade mobile and web applications on FlutterFlow, Bubble, Retool, Lovable, and Podio. We deliver 40–60% faster and more affordably than traditional agencies.
Book a Free Scoping CallRelated Guides & Articles
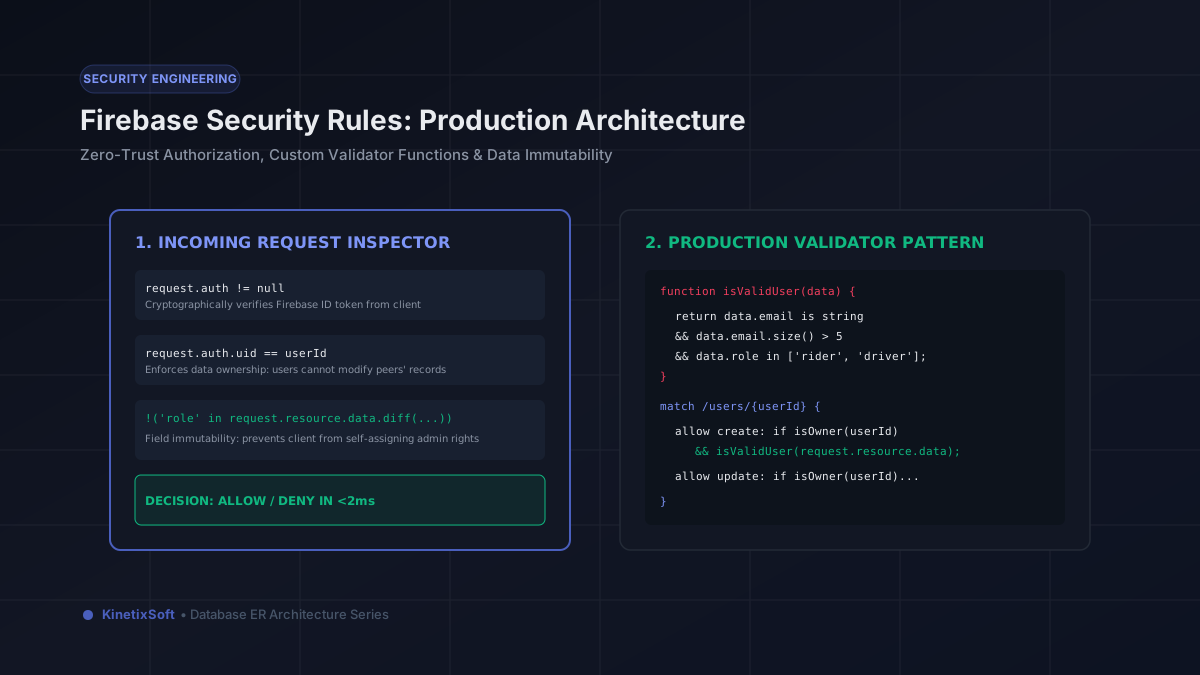
Mastering Firebase Security Rules in FlutterFlow: Complete Production Implementation Guide
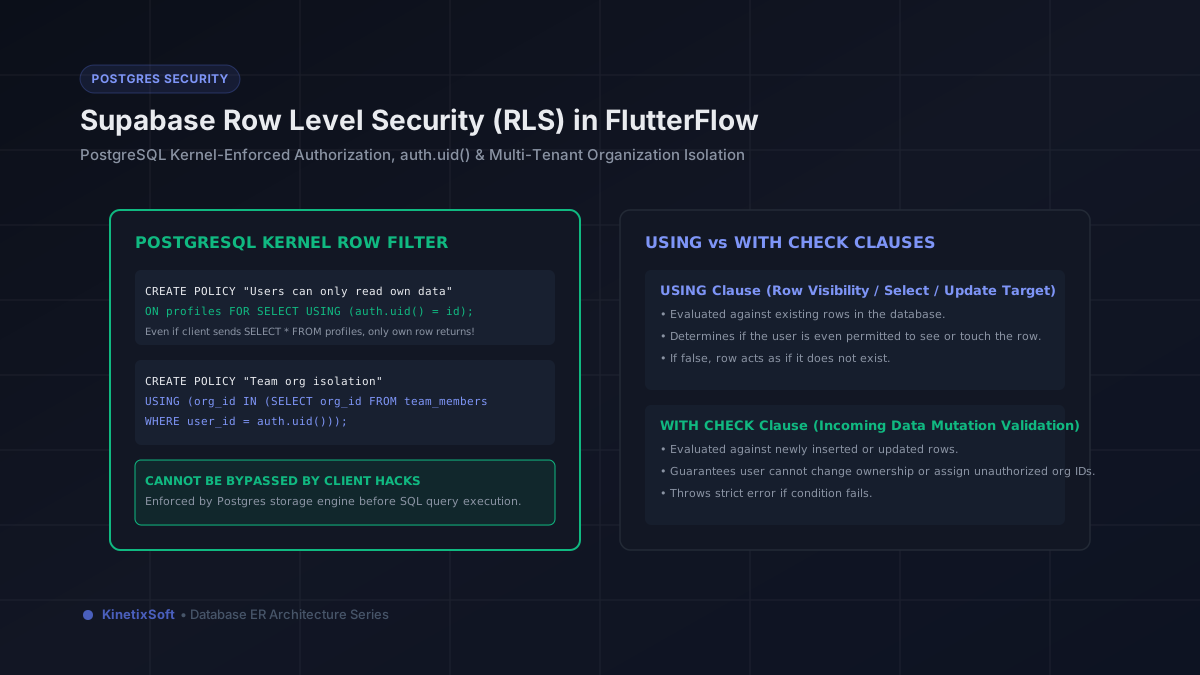
Supabase Row Level Security (RLS) in FlutterFlow: The Comprehensive Engineering Guide